Friday, April 28, 2017

Windows Server 2016: How to enable vTPM and Bitlocker on a Hyper-V VM

In a perfect world, all Hyper-V instances would be running on a Guarded Fabric with Host Guardian Service and Shielded VMs enabled. Unfortunately, for smaller environments and branch offices this may be overkill or cost prohibitive.

This is specially true given that Windows Server 2016 - Datacenter Edition is required for Shielded VMs.

That said, to add a layer of protection to your Server 2016 VMs, you can enable vTPM and Bitlocker.  With Windows Server 2016 Hyper-V, you can enable a Virtual Trusted Platform Module 2.0 (vTPM) on a VM.  The cool thing is, the physical Hyper-V host does NOT need to have TPM.

With the vTPM now enabled, you can enable BitLocker within your VM.  The VM can how be placed in a Remote Office or hosted infrastructure without worrying about the VM files being stolen or copied.

Lets get started:

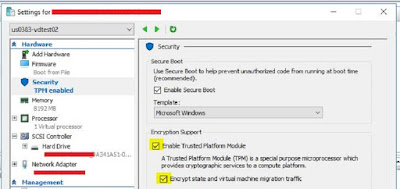
1. Gracefully shutdown the VM and enable vTPM

2. Power on the VM and confirm that the vTPM has been installed.

Alternatively, you can run the following command on the host running the VM: get-vmsecurity myvm

3. Enable BitLocker within the VM by running the following command: Install-WindowsFeature -Name BitLocker -IncludeAllsubfeature -IncludeManagementTools

Restart the server.

4. Enable BitLocker within the VM
Testing:

1. The vhdx was copied to another instance of Hyper-V .  A fresh VM has created around this vhdx file.  Upon power on, it requested the recovery Key.  The Key was entered and the Vm started up as expected. 

2. Next, the entire VM folder was copied to another Hyper-V instance.  The Import Virtual Machine option was used.  “Register the virtual machine in-place (use the existing unique ID)” selected.  I received the following error and it immediately powered off.


3. Finally, I attached the vhdx to the host running the VM and placed it online.

I was unable to access the contents of the drive.

Additional Notes:  In the event that a VM needs to permanently move hosts, I confirmed that turning Bitlocker off, enabling vTPM, then re-enabling BitLocker allowed the VM to boot up normally. 

Windows Server 2016: How to Enable Nested Virtualization

YES, you can run LINUX within the nested Hyper-V instance!

Requirements and limitations at the time of this post:
  • VMs must be running Windows Server 2016 or Windows 10 Anniversary Update. 
  • VMs must be running versions 8.0 or above.
  • The host processors must support Intel VT/AMD-V and Intel XD/AMS NX.  To confirm your server meets these requirements, run "systeminfo" BEFORE installing the Hyper-V roll

1. Create the VM which will run the Hyper-V Role.  For testing, I used Server 2016 Standard Edition with Desktop Experience.  See requirements above.

2. Confirm the newly created VM is powered off and run the following command on the physical Hyper-V host to enable the Virtualization Extensions on the VM:

Set-VMProcessor -VMName <VMName> -ExposeVirtualizationExtensions $true


3. Power on the VM and enable the Hyper-V role by running the following commandlet:

Install-WindowsFeature -Name Hyper-V -ComputerName <computer_name> -IncludeManagementTools -Restart

4. Confirm that the role has been installed successfully by running the get-windowsfeature command.

5. Networking must now be setup.  There are two options:
     A. MAC Address Spoofing
     B. Network Address Translation (NAT)

For testing, I chose to go the MAC spoofing route.  Run the following command on the physical host:

Get-VMNetworkAdapter -VMName <VMName> | Set-VMNetworkAdapter -MacAddressSpoofing On


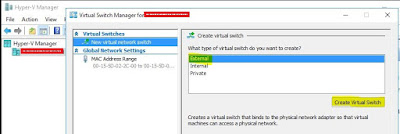
6. From within the Hyper-V VM, create a new Virtual Switch:

7. This particular VM was only configured with a single vNic,  Confirm that "Allow management OS to share this network adapter" is checked.

8. Create a new VM within the nested Hyper-V instance.  For testing I like to use the TinyCore version of Tiny Core Linux.   Create it using Generation 1 hardware, the Virtual Switch created above and select the "Install an OS from bootable CD/DVD-Rom".

http://www.tinycorelinux.net/downloads.html

TCL can be found in .ova format in the following thread:
https://communities.vmware.com/docs/DOC-21621

It takes very little resources and has a basic graphical interface.   Here, I confirmed networking has been configured properly by pinging the gateway of the local LAN:


Enjoy your new found testing options!

Friday, April 21, 2017

How to View Your VMware Platform Services Controller (PSC) Configuration

Ever wondered what the sites and replication partners of your PSC are?  The easiest way to view these settings and others of your VMware PSC is by using the JXplorer product.  The application can be found here:

http://jxplorer.org/downloads/users.html

Select and install the appropriate client for your environment.   I chose Base JXplorer for Windows.

Launch the JXplorer application and select File > Connect
Enter your PSC information.  

EX.
Host: SSO_node.domain.local or psc1.domain.local
Protocol: 
LDAPv3
Port: 
11711 for vSphere 5.5 or 389 for vSphere 6.0
Base DN: 
dc=vsphere,dc=local
Level: 
User + Password
User DN: 
cn=Administrator,cn=Users,dc=vsphere,dc=local


Once you have successfully connected, you can quickly and easily view your sites and replication partners.