Requirements and limitations at the time of this post:
- VMs must be running Windows Server 2016 or Windows 10 Anniversary Update.
- VMs must be running versions 8.0 or above.
- The host processors must support Intel VT/AMD-V and Intel XD/AMS NX. To confirm your server meets these requirements, run "systeminfo" BEFORE installing the Hyper-V roll
2. Confirm the newly created VM is powered off and run the following command on the physical Hyper-V host to enable the Virtualization Extensions on the VM:
Set-VMProcessor -VMName <VMName> -ExposeVirtualizationExtensions $true
3. Power on the VM and enable the Hyper-V role by running the following commandlet:
Install-WindowsFeature -Name Hyper-V -ComputerName <computer_name> -IncludeManagementTools -Restart
4. Confirm that the role has been installed successfully by running the get-windowsfeature command.
5. Networking must now be setup. There are two options:
A. MAC Address Spoofing
B. Network Address Translation (NAT)
For testing, I chose to go the MAC spoofing route. Run the following command on the physical host:
Get-VMNetworkAdapter -VMName <VMName> | Set-VMNetworkAdapter -MacAddressSpoofing On
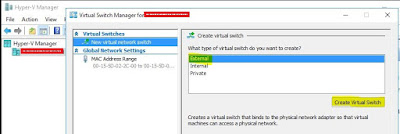
6. From within the Hyper-V VM, create a new Virtual Switch:
7. This particular VM was only configured with a single vNic, Confirm that "Allow management OS to share this network adapter" is checked.
8. Create a new VM within the nested Hyper-V instance. For testing I like to use the TinyCore version of Tiny Core Linux. Create it using Generation 1 hardware, the Virtual Switch created above and select the "Install an OS from bootable CD/DVD-Rom".
http://www.tinycorelinux.net/downloads.html
TCL can be found in .ova format in the following thread:
https://communities.vmware.com/docs/DOC-21621
It takes very little resources and has a basic graphical interface. Here, I confirmed networking has been configured properly by pinging the gateway of the local LAN:
Enjoy your new found testing options!


No comments:
Post a Comment