Wednesday, November 26, 2014

PowerCLI: How to disable VAAI using the Set-AdvancedSetting cmdlet

I've been working with our Sr Storage Engineer regarding the time it takes to create Eager Zero VMDKs on our array.  (25minutes for a 20GB vmdk... rolling eyes)

Anyways,  back to the story......VMware asked me to disable VAAI on one of my hosts.  A Google search pointed me to the following KB: 1033665

As of today, the KB references a PowerCLI cmdlet which has been deprecated (Set-VMHostAdvancedConfiguration).

To use the Set-AdvancedSetting cmdlet, it must be used with the Get-AdvancedSetting cmdlet.  To disable VAAI on a host, run the following 3 commands.

Get-AdvancedSetting -Entity MyHost.MyDomain.com –Name DataMover.HardwareAcceleratedMove | Set-AdvancedSetting –Value 0

Get-AdvancedSetting -Entity MyHost.MyDomain.com -Name DataMover.HardwareAcceleratedInit |  Set-AdvancedSetting -Value 0


Get-AdvancedSetting -Entity MyHost.MyDomain.com -Name VMFS3.HardwareAcceleratedLocking |  Set-AdvancedSetting -Value 0


To reverse the changes, just replace the 0's with 1's.

Thursday, November 20, 2014

Powershell: How to find your Domain Controllers AND confirm a Hotfix has been installed.

On Nov 18th 2014 Microsoft released the following significant Out-of-band security patch.  (If you haven't already, INSTALL IT!):
https://support.microsoft.com/kb/3011780

I was asked to confirm that all the Domain Controllers have been patched in our region.  I leveraged Powershell to get the information quickly. 

First, get a dump of all the DCs in your environemnt:
Get-ADDomainController -Filter * | select name

After getting the names of the DCs, use get-hotfix against the DC(s):
Get-HotFix -Id KB3011780 -ComputerName mydomaincontroller

Our environment is relatively big.  So, I created a csv file (dcs.csv) which contained the names of the DCs and ran the following:
 Import-csv E:\dcs.csv | ForEach-Object {Get-HotFix -Id kb3011780 -computername $_.computername}
 

Tuesday, November 11, 2014

AWS EC2 error code: 'insufficientInstanceCapacity'

I recently received the following error while trying to Start an instance in AWS:

AWS EC2 error code: 'insufficientInstanceCapacity'

WHAT!  I thought The Cloud was supposed to have "Infinite" capacity and resources.

Anyway,  I waited a few minutes an was able to successfully start the instance.

Additional Info:  I found the following reply from AWS regarding why this may occur. (AWS Log-in required):

 https://forums.aws.amazon.com/thread.jspa?threadID=37054&tstart=0

We'd like to provide some additional information about what you can do should you receive an insufficient capacity response when submitting a request to launch new instances.

There can be short periods of time when we are unable to accommodate instance requests that are targeted to a specific Availability Zone.  When a particular instance type experiences unexpected demand in an Availability Zone, our system must react by shifting capacity from one instance type to another.  This can result in short periods of insufficient capacity.  We incorporate this data into our capacity planning and try to manage all zones to have adequate capacity at all times.  The following steps will ensure that you will have the best experience launching Amazon EC2 instances when an initial insufficient capacity message is received:

1. Don't specify an Availability Zone in your request unless necessary.  By targeting a specific Availability Zone you eliminate our ability to satisfy that request by using our other available Availability Zones.  Please note that a single RunInstances call will allocate all instances within a single Availability Zone.

2. If you require a large number of instances for a particular job, please request them in batches. The best practice to follow here is to request 25% of your total cluster size at a time.  For example, if you want to launch 200 instances, launching 50 instances at a time will result in a better experience.

3. Try using a different instance type.  As capacity varies across instance types, attempting to launch difference instance types provides spill over capacity should your primary instance type be temporarily unavailable.

Regards,
Justin

Monday, November 10, 2014

AWS EC2 - How to expand an Amazon EBS volume.

How to extend, grow, resize an Amazon EBS volume.

The network guys needed to extend the volume of one of their network management servers.  I've performed this function 100's of times in my VMware environment.  However, this is the first time I'm extending a volume on an EC2 instance.  I thought I'd document the steps.

1. Shutdown/Stop the instance you wish to expand or gracefully shut down the server within the OS (preferred).  I'm suprised there isn't a shutdown option available through AWS.

2. Click on the instance and select Create Snapshot and enter the snapshot details:
3.  After the snapshot has been created, create a new volume from the snapshot.
4. Enter the appropriate Type, Size and Availability Zone for the volume.

Selecting the Type - General Purpose (SSD) -creates a Volume Type of gp2.
Selecting the Type - Magnetic - creates a Volume Type of standard.
  
5. Detach the old volume from the instance after noting the Device Name of the volume being removed.

  
6.  Attach the newly created volume to the instance.  Enter the Device info noted earlier.

7.  Start the instance and confirm that the new space is available.  (I absolutely LOVE the lsblk command in linux!)

8. Expand the volume using the OS tools.

9. Delete the old volume and enter the appropriate name and details on the new volume.

Sunday, November 9, 2014

How to Import VM disks/vmdks from vSphere to EC2.

At this time, importing a VM with more than one disk is not supported by EC2.  Amazons work around is to import the VM with only the boot drive.  Then, import any additional disks using the ec2-import-volume and ec2-attach-volume command. This post goes over the vmdk import process.  

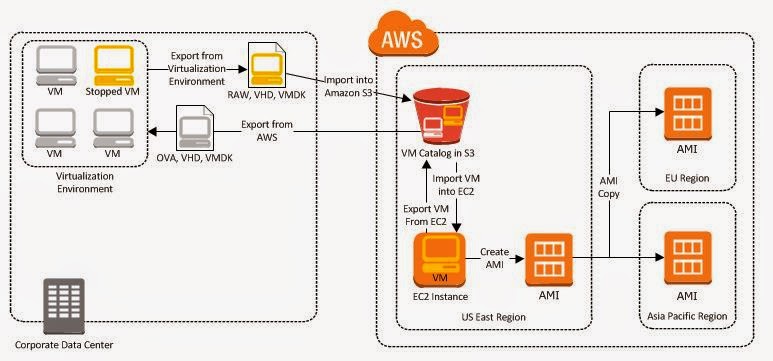
Below is the work flow for importing the vmdk into EC2.


Basically, you export the VM to an OVF template.  You then temporarily import the VMDK into an AMAZON S3 bucket.  The VMDK is then automatically converted to the EC2 format and placed in the Elastic Block Store (EBS).

Here are the steps I took to add the second disk to a migrated VM:

1.  Download the Amazon EC2 API Tools:
https://aws.amazon.com/developertools/Amazon-EC2/351
 

2. Unzip ec2-api-tools.zip. No installation is required, just unzip. 

3. Install Java 1.7 or later. (If Needed).
http://www.java.com/en/download/index.jsp 

4.  Set Environment Variables:
http://docs.aws.amazon.com/AWSEC2/latest/CommandLineReference/set-up-ec2-cli-windows.html

5. Create an S3 bucket to temporarily hold the VMDK. 

6. Using the vSphere client, select the VM and Export OVF Template...


7.  From the command prompt, drill down to the location of the VMDK you wish to import.  Then run the following command:

ec2-import-volume yourdisk.vmdk -f VMDK -z us-east-1a -s 9 -b myS3bucket -o AKIAIOSFODNN7EXAMPLE -w wJalrXUtnFEMI/K7MDENG/bPxRfiCYEXAMPLEKEY


-f = file format
-z = availability zone
-s = size in GB
-b = your S3 bucket
-0 = owner access key
-w = owner secret key


Additional details of this command can be found here: 

8.  After importing the vmdk into S3, it will automatically be converted into an EBS volume.  This will take some time.  To view the progress, run the following command:

ec2-describe-conversion-tasks [task_id ...] 

9. After the conversion has completed, attach the imported EBS volume to the VM run the following command:

ec2-attach-volume vol-1a2b3c4d -i i-1a2b3c4d -d /dev/sdh


This can also be performed through the GUI.  For Linux volumes use /dev/sdf - /dev/sdp

10.  Power on the VM and confirm functionality. 

11.  Clean up the S3 bucket and enter the volume name for management purposes.

Saturday, November 8, 2014

Migrate to EC2: VM has more than one disk attached, which is not supported for VM migration

You've setup the AWS Management Portal/Connector for vCenter and are ready to migrate the appropriate workloads to EC2.  You power off the VM, Right Click and select "Migrate to EC2". 
Easy peasy, Right?  Well, it is until you receive the following error:

VM has more than one disk attached, which is not supported for VM migration


At this time, importing a VM with more than one disk is not supported.  Heck, most of my VMs have several VMDKs associated with them... 

Amazons work around is to import the VM with only the boot drive.  Then import any additional disks using the ec2-import-volume and ec2-attach-volume command.

I attempted to "trick" EC2 into thinking the VM had only one disk by selecting "Remove from virtual machine" in the settings.  Unfortunately, this produced the same error.


Since I didn't want to delete the vmdk from the original VM,  I created a clone of the VM with the "Remove from VM" setting selected.  This worked.


In my next post, I will go through the disk import and attach process.

Friday, November 7, 2014

AWS Managment Portal for vCenter Setup and Configuration Notes

I've been using the AWS Connector for vCenter to import VMs from our internal infrastructure to AWS EC2.  For the most part, the instructions provided by Amazon were pretty thorough.

http://docs.aws.amazon.com/amp/latest/userguide/introduction.html

I'm just wanted to point out some minor issues I ran across.

1. When entering your domain and user account information, confirm that the letter case is accurate.

2. Insufficient resources to satisfy configured failover level for vSphere HA - After deploying the AWS Connector OVA, I was unable to power on the VM.  To resolve this issue, remove the CPU and Memory Reservations (or increase Host resources to accommodate the reservations):

3. vCenter user "Domain\ADUser" does not have administrator privileges - During the AWS Connector setup process, I received the error below.  At this time, AWS does not support AD groups. 

Although the account I attempted to use was an Administrator of the vCenter server through the use of AD groups,  I had to explicitly add the account as an Administrator at the vCenter server level.  

4. Failed to retrieve information about domains and users from vCenter due to internal error - When trying to assign permissions through the AWS Managment Portal Plug-in I received the following error:


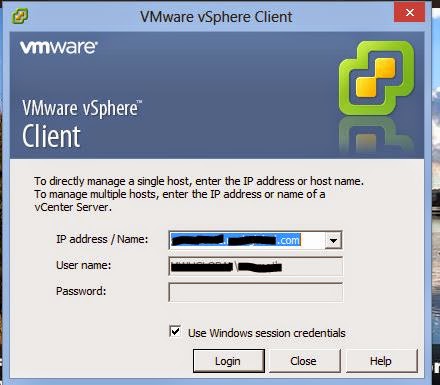
To resolve this issue, log in to the vSphere Client using the FQDN of the vCenter server: