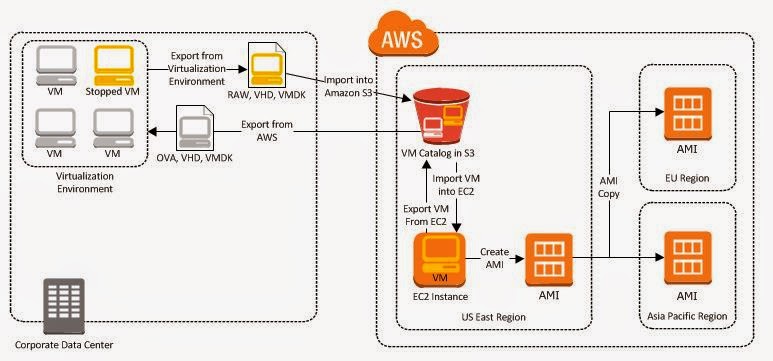
Below is the work flow for importing the vmdk into EC2.
Basically, you export the VM to an OVF template. You then temporarily import the VMDK into an AMAZON S3 bucket. The VMDK is then automatically converted to the EC2 format and placed in the Elastic Block Store (EBS).
Here are the steps I took to add the second disk to a migrated VM:
1. Download the Amazon EC2 API Tools:
https://aws.amazon.com/developertools/Amazon-EC2/351
2. Unzip ec2-api-tools.zip. No installation is required, just unzip.
3. Install Java 1.7 or later. (If Needed).
http://www.java.com/en/download/index.jsp
4. Set Environment Variables:
http://docs.aws.amazon.com/AWSEC2/latest/CommandLineReference/set-up-ec2-cli-windows.html
5. Create an S3 bucket to temporarily hold the VMDK.
6. Using the vSphere client, select the VM and Export OVF Template...
ec2-import-volume yourdisk.vmdk -f VMDK -z us-east-1a -s 9 -b myS3bucket -o AKIAIOSFODNN7EXAMPLE -w wJalrXUtnFEMI/K7MDENG/bPxRfiCYEXAMPLEKEY
-f = file format
-z = availability zone
-s = size in GB
-b = your S3 bucket
-0 = owner access key
-w = owner secret key
Additional details of this command can be found here:
8. After importing the vmdk into S3, it will automatically be converted into an EBS volume. This will take some time. To view the progress, run the following command:
ec2-describe-conversion-tasks [task_id ...]
9. After the conversion has completed, attach the imported EBS volume to the VM run the following command:
ec2-attach-volume
vol-1a2b3c4d -i i-1a2b3c4d -d /dev/sdh
This can also be performed through the GUI. For Linux volumes use /dev/sdf - /dev/sdp
10. Power on the VM and confirm functionality.
11. Clean up the S3 bucket and enter the volume name for management purposes.


No comments:
Post a Comment