Saturday, September 16, 2017

vSphere 6.5 - I/O error accessing change tracking file

Recently, I had to migrate a set of VMs from one vCenter server to another.   I was able to successfully migrate the dev and staging VMs without a problem.  This process took 15 minutes TOPS including reboots.

Of course, when I went to power up the production VMs, I received the following error through the Web Client:

I/O error accessing change tracking file


This error was a bit deceiving, a quick look at the error showed a familiar error:

Cannot open the disk '/vmfs/volumes/ or one of the snapshot disks it depends on.


This error message pointed me directly to the vmdk with the error and I was able to perform the steps in the following KB to resolve this issue.

https://kb.vmware.com/selfservice/microsites/search.do?language=en_US&cmd=displayKC&externalId=2009244

Wednesday, September 6, 2017

vSphere 6.5 - Platform Services Controller (PSC) – Recommended Topology, Restore and Design Considerations


I recently had to work with VMware on a PSC issue and thought I'd share the information collected.

***Update 09.07.17*** - For those of you who are performing new install or upgrading to vSphere 6.5, VMWare recently released a vSphere 6.5 Topology and Upgrade Planning Tool. It can be found here:

https://vspherecentral.vmware.com/path-finder

General Info:
  1. What’s being replicated:
    1. SSO
    2. Tags
    3. Custom Roles
    4. Global Permissions
    5. Licensing.
  2. Below is a link to supported and deprecated topologies for vSphere 6.5.
  3. PSCs are in a Multi-master Model.  
  4. A replication agreement (Bidirectional) is created at the time the PSC is built/installed.  All additional replication agreements must be created manually. (Vdcrepadmin)
  5. Replication between PSCs occurs every 30 seconds.
  6. A vCenter server can only point to one PSC.
  7. Starting 6.5 U1, a single PSC can manage up to 15 vCenter servers.
  8. 6.5 U1 supports up to 10 external PSCs in an SSO domain.
  9. An SSO Site is a logical boundary.
  10. Starting with version 6.5, you cannot re-point a vCenter server across SSO sites.  This WAS previously possible in version 6.0.
  11. Enhanced Linked Mode requires an External PSC. 
Recommended PSC Topology:
  1. Create as few replication agreements as possible, while preventing PSC Isolation.
  2. A Ring Topology is recommended. (Linear)
Restore Information:
  1. In the event that all your PSC instances have failed, and you have no good backups, you will need to REINSTALL your entire environment.
  2. vCenter Server and PSC Restore Work Flow information.
  3. Restoring a vCenter Server Environment with multiple PSCs:
    1. Restore a Single Failed PSC.
      1. Deploy a New PSC instance and join it to an active PSC in the same vCenter SSO domain and site.
    1. Restore All Failed PSC Instances:
      1. Restore the Most Recently Backed Up PSC VM.
      2. Run the vcenter-restore Script registered with the restored PSC.
      3. Deploy Additional PSC instances and join them to the same vCenter SSO domain.
      4. Repoint back the connections between vCenter and PSC Instances.

Important Commands:
  1. vdcrepadmin – The command is located in the following directory of the PSC: /usr/lib/vmware-vmdir/bin.  KB 2127057
    1. Showservers – Displays all the PSCs in a vSphere domain.
      1. Ex. vdcrepadmin -f showservers -h psc1.vmware.local -u administrator -w VMw@re123
    2. Showpartners – Displays the current partnerships from a single PSC within a vSphere Domain
      1. Ex. vdcrepadmin -f showpartners -h psc1.vmware.local -u administrator -w VMw@re123
    3. Showpartnerstatus – Displays the current replication status of a PSC and any of the replication partners of the PSC
      1. Ex. vdcrepadmin -f showpartnerstatus -h localhost -u administrator -w VMw@re123
    4. Createagreement and removeagreement – Allows for the creation and removal of additional replication agreements between PSCs in a vSphere domain.
      1. Ex. vdcrepadmin -f createagreement -2 -h psc1.vmware.local -H psc4.vmware.local -u Administrator -w VMw@re123
      2. vdcrepadmin -f removeagreement -2 -h psc1.vmware.local -H psc3.vmware.local -u Administrator -w VMw@re123
  2. cmsso-util – Command used to repoint between external PSC within a site.  KB2113917.
    1. Ex. cmsso-util repoint --repoint-psc systemname_of_second_PSC


Monday, August 14, 2017

Storage vMotion Error: A general system error occurred: PBM error occurred during PreMigrateCheckCallback: Connection refused

I just tried to perform a Storage vMotion on a VM and received the following error:


I took a look at the services running on the vCSA by running "service-control --status".  It appears the VMware vSphere Profile-Driven Storage Service (vmware-sps) had stopped.


To get the service running, just run the following command:  service-control --start vmware-sps


I was then able to successfully perform a storage vMotion.

Bonus info:
Here's a list of services running on the vsphere 6.X vCSA:


Monday, July 3, 2017

vCenter Server 6.5 Upgrade: Issues and Lessons Learned


Just wanted to share some lessons learned from the upgrade/migration of one of our vCenter Servers.

In this scenario, we used the VMware Migration Assistant to go from a Windows Based vCenter 5.5 server using an external SQL DB to the vCSA 6.5.

**Make sure you read the Important Information KB, Upgrade Best Practices KB and the Release Notes (Links valid as of July 3rd 2017)**

https://kb.vmware.com/selfservice/microsites/search.do?language=en_US&cmd=displayKC&externalId=2147686

https://kb.vmware.com/selfservice/microsites/search.do?language=en_US&cmd=displayKC&externalId=2147548

https://docs.vmware.com/en/VMware-vSphere/6.5/rn/vsphere-vcenter-server-650d-release-notes.html

Here are the challenges I encountered during my upgrade in chronological order:
####
2017-04-11T20:56:15.429Z   Component Manager registration failed - {
    "resolution": null,
    "detail": [
        {
            "args": [
                "Service already registered in Component Manager; url:http://localhost:18090/cm/sdk/?hostid=afd6a1f9-6009-48f9-a4f3-ed068a88f873, id:xxxxxx-3899-4941-8E86-xxxxxx"
            ],
            "id": "com.vmware.cisreg.svc_already_registered",
            "localized": "The service is already registered:Service already registered in Component Manager; url:http://localhost:18090/cm/sdk/?hostid=afd6a1f9-6009-48f9-a4f3-ed068a88f873, id:xxxxxx-3899-4941-8E86-xxxxxx",
            "translatable": "The service is already registered:%(0)s"
        }
####
  • I was unable to upgrade, since it thought it was already at version 6.5.  This required the use of jxplorer to delete the offending service prior to retrying the upgrade.  Here's a link to resolve this issue: http://kenumemoto.blogspot.com/2017/05/vcenter-65-upgrade-problem-occurred.html
  • After another failed upgrade, we were able to start the vCenter Service (vpxd) after initializing the embedded vPostgres DB...  Essentially overwriting the entire contents of the DB…  the problem seems to be pointing to the source vCenter DB.  Given the complexity of our environment, starting from scratch was not an option. 
  • Ultimately, our vCenter 5.5 SQL vCenter DB was FTP'd to VMware so they were able to perform the upgrade and replicate the failure.  The escalation team was able to perform the upgrade in verbose mode to monitor each step of the upgrade.  They were able to successfully start the vpxd service after truncating the “vpx_field_val” table.   This contained all the Custom Attribute info.  When I saw the offending entries, they were employees who were no longer with the company.  These entries were pointing to VMs that no longer existed, and this was halting the upgrade... for some reason, these orphaned entries were not properly removed from VC DB.   No solid explanation was received, it could have been an un-graceful shutdown of the vCenter or sql server, iSCSI traffic issue, etc.
  • Our SQL DBA truncated the table named "vpx_field_val"
  • Prior to performing the upgrade the final time, I exported all the Custom Attributes to a .csv file.   After the successful upgrade, I used powershell and powercli to re-inject the info into vcenter.  (There was no way I was going to manually enter all those attributes for each of the 300+ VMs.)
  • To confirm the status of the upgrade few the following log: /var/log/firstboot/firstbootStatus.json
  • Add a Static DNS entry for your new vCSA.  Since the vCSA is running on a version of linux, we can no longer leverage Windows Dynamic DNS updates and the existing entry will eventually age out. 

How to View the Group Policy Settings Applied to a Computer

I had an Admin ask me this question recently, so I figured I share the info.

As your Domain grows and your Group Policies become more complex, it becomes difficult to keep track of which group policies are applied to a specific computer.  

To quickly find out the GPs applied to a computer, use the GpResult command.  The command displays the Resultant Set of Policy (RSoP) information for a user and computer.  

https://technet.microsoft.com/en-us/library/cc733160%28v=ws.11%29.aspx?f=255&MSPPError=-2147217396

The following example dumps a verbose output of the gpresult for the user and computer into a file called gpresult.txt 

gpresult  /v > D:\gpresult.txt.

You can then search the file for a specific policy.

To view a GUI version,  run rsop.msc


Tuesday, June 20, 2017

vSphere Web Client - Unmount Datastore Grayed out.

It was time to decommission one of our iSCSI datastores.  I ensured the following:
  • All VMs, snapshots and templates have been migrated off.
  • Datastore is not used for HA heartbeat
  • Not part of a datastore cluster.
  • Not configured as a coredump partition
  • Storage I/O Control disabled 
**Go through the complete unmounting a LUN checklist prior to unmounting a LUN: 


When I tried to unmount the datastore, using the vSphere Web Client, the option was grayed out...


Workaround: 
After going through the detailed checklist in VMware KB 2004605  I went OLD SCHOOL and used the VMware vSphere Client to log directly into the host using the Datastore.  Through the vSphere Client, I was able to successfully unmount the datastore.

FYI - You can still point your vSphere Client directly to an ESXi 6.5 host.


Jan 23rd 2018 Update:
It happened again, this time I used the web client pointed directly at the ESXi host to perform the unmount function:


Friday, June 16, 2017

VMWare vCenter Converter 6.1.1 works with vSphere 6.5

** Confirmed - I have successfully P2V'd a production SQL server managed by a vCenter 6.5 server. No Biggie**

I recently received a request to P2V an old Windows Server 2008 R2 server.  I'll be honest, the last time I used Converter was with version 5.X.

I go to VMware.com and the latest version of VMware Converter is 6.1.1.  This version was released back in February of 2016. This predates the release of vSphere 6.5.

Sure enough, in the VMware Converter document, it states that it only supports up to vCenter Server 6.0.  I'm running vSphere 6.5, time to test...

** Perform the VM conversion at your own risk. This is not a VMware supported configuration **

Fortunately, this version is very similar to previous versions I've used.  I installed the Converter application on the source VM and "let er run".  Nothing fancy, the default options were taken

Well, I lucked out and was able to successfully perform the migration.  Good Luck!

Thursday, June 8, 2017

vCSA 6.5: How to Find Which PSC your vCSA is pointing to, its SSO Domain Name and SSO Site Name

I was recently asked for some SSO and PSC config info for a vCSA running version 6.5.  Just SSH into your vCSA and run the following one-liners:

To find your SSO Domain Name:
/usr/lib/vmware-vmafd/bin/vmafd-cli get-domain-name --server-name localhost

To find your SSO Site Name:
/usr/lib/vmware-vmafd/bin/vmafd-cli get-site-name --server-name localhost

To find you which PSC your vCSA is pointing to:
/usr/lib/vmware-vmafd/bin/vmafd-cli get-ls-location --server-name localhost


Wednesday, May 24, 2017

How to log all PuTTY sessions

Here's a quick tip on how to set up logging in PuTTY.  It's great for reviewing the changes made and for documentation purposes. 

1. Launch PuTTY and go to Logging.  I personally select All Session Output and also like to specify the Host, Month, Date, Year and Time of each log.  It makes the management of the logs easier.

ex.   E:\PuTTYLogs\&H_&M&D&Y_&T.log


2.  Now go up to Session, select Default Settings and click Save.

3. Test - SSH into a host and confirm a log files has been automatically created.


vCenter 6.5 upgrade: A problem occurred while - Starting VMware vCenter Server...

After an initial failed attempt at migrating a Windows based vCenter 5.5 to vCSA 6.5, I received the following error during the subsequent retry:

A problem occurred while - Starting VMware vCenter Server


The \var\log\firstboot\vpxd_firstboot.ph_xxxxx_stdout.log within the vm-support bundle revealed that a service was already registered in component manager.  

This was  due to a previously failed upgrade attempt:


Make note of the id number in red in the example above.  Launch JXplorer and connect to your PSC.  Details regarding JXplorer can be found here:

http://kenumemoto.blogspot.com/search?q=Jxplorer

Drill down to the following location.  Select the offending service and view the details.  As you can see,  it's incorrectly showing as Version 6.5.


Right-Click on the offending service, then click Delete.   Now restart the upgrade\migration process.

How To Find Your vCSA Embedded Database Password

To perform an export of your vCSA VCDB you need to supply the user and password to the PostgreSQL Database.  During the vCSA setup process, we were not prompted to provide one and there is no default password for the VCDB.

Fortunately, there is an easy way to access the password.  (It's actually FRIGHTENINGLY easy....).  Run the following command on your vCSA:

cat /etc/vmware-vpx/vcdb.properties

This will provide the VCDB password along with other details about your VCDB.

WinSCP and vCSA - Host is not communicating for more than 15 seconds. Still waiting...

I recently needed to pull a backup of the VCDB off a vSphere 6.5 vCSA.  I started WinSCP and received the following error:


To resolve this issue, SSH into your vCSA and run the following command to change the user's login shell to BASH:

chsh -s /bin/bash root

You will now be able to successfully connect to the vCSA.

To reverse the change run the following:

chsh -s /bin/appliancesh root

Friday, April 28, 2017

Windows Server 2016: How to enable vTPM and Bitlocker on a Hyper-V VM

In a perfect world, all Hyper-V instances would be running on a Guarded Fabric with Host Guardian Service and Shielded VMs enabled. Unfortunately, for smaller environments and branch offices this may be overkill or cost prohibitive.

This is specially true given that Windows Server 2016 - Datacenter Edition is required for Shielded VMs.

That said, to add a layer of protection to your Server 2016 VMs, you can enable vTPM and Bitlocker.  With Windows Server 2016 Hyper-V, you can enable a Virtual Trusted Platform Module 2.0 (vTPM) on a VM.  The cool thing is, the physical Hyper-V host does NOT need to have TPM.

With the vTPM now enabled, you can enable BitLocker within your VM.  The VM can how be placed in a Remote Office or hosted infrastructure without worrying about the VM files being stolen or copied.

Lets get started:

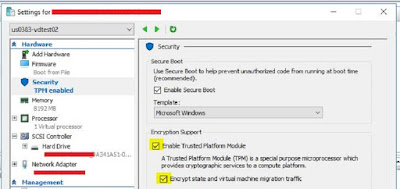
1. Gracefully shutdown the VM and enable vTPM

2. Power on the VM and confirm that the vTPM has been installed.

Alternatively, you can run the following command on the host running the VM: get-vmsecurity myvm

3. Enable BitLocker within the VM by running the following command: Install-WindowsFeature -Name BitLocker -IncludeAllsubfeature -IncludeManagementTools

Restart the server.

4. Enable BitLocker within the VM
Testing:

1. The vhdx was copied to another instance of Hyper-V .  A fresh VM has created around this vhdx file.  Upon power on, it requested the recovery Key.  The Key was entered and the Vm started up as expected. 

2. Next, the entire VM folder was copied to another Hyper-V instance.  The Import Virtual Machine option was used.  “Register the virtual machine in-place (use the existing unique ID)” selected.  I received the following error and it immediately powered off.


3. Finally, I attached the vhdx to the host running the VM and placed it online.

I was unable to access the contents of the drive.

Additional Notes:  In the event that a VM needs to permanently move hosts, I confirmed that turning Bitlocker off, enabling vTPM, then re-enabling BitLocker allowed the VM to boot up normally. 


Windows Server 2016: How to Enable Nested Virtualization

YES, you can run LINUX within the nested Hyper-V instance!

Requirements and limitations at the time of this post:
  • VMs must be running Windows Server 2016 or Windows 10 Anniversary Update. 
  • VMs must be running versions 8.0 or above.
  • The host processors must support Intel VT/AMD-V and Intel XD/AMS NX.  To confirm your server meets these requirements, run "systeminfo" BEFORE installing the Hyper-V roll

1. Create the VM which will run the Hyper-V Role.  For testing, I used Server 2016 Standard Edition with Desktop Experience.  See requirements above.

2. Confirm the newly created VM is powered off and run the following command on the physical Hyper-V host to enable the Virtualization Extensions on the VM:

Set-VMProcessor -VMName <VMName> -ExposeVirtualizationExtensions $true


3. Power on the VM and enable the Hyper-V role by running the following commandlet:

Install-WindowsFeature -Name Hyper-V -ComputerName <computer_name> -IncludeManagementTools -Restart

4. Confirm that the role has been installed successfully by running the get-windowsfeature command.

5. Networking must now be setup.  There are two options:
     A. MAC Address Spoofing
     B. Network Address Translation (NAT)

For testing, I chose to go the MAC spoofing route.  Run the following command on the physical host:

Get-VMNetworkAdapter -VMName <VMName> | Set-VMNetworkAdapter -MacAddressSpoofing On


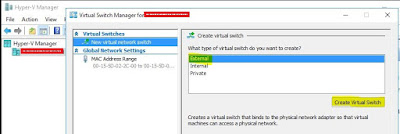
6. From within the Hyper-V VM, create a new Virtual Switch:

7. This particular VM was only configured with a single vNic,  Confirm that "Allow management OS to share this network adapter" is checked.

8. Create a new VM within the nested Hyper-V instance.  For testing I like to use the TinyCore version of Tiny Core Linux.   Create it using Generation 1 hardware, the Virtual Switch created above and select the "Install an OS from bootable CD/DVD-Rom".

http://www.tinycorelinux.net/downloads.html

TCL can be found in .ova format in the following thread:
https://communities.vmware.com/docs/DOC-21621

It takes very little resources and has a basic graphical interface.   Here, I confirmed networking has been configured properly by pinging the gateway of the local LAN:


Enjoy your new found testing options!

Friday, April 21, 2017

How to View Your VMware Platform Services Controller (PSC) Configuration

Ever wondered what the sites and replication partners of your PSC are?  The easiest way to view these settings and others of your VMware PSC is by using the JXplorer product.  The application can be found here:

http://jxplorer.org/downloads/users.html

Select and install the appropriate client for your environment.   I chose Base JXplorer for Windows.

Launch the JXplorer application and select File > Connect
Enter your PSC information.  

EX.
Host: SSO_node.domain.local or psc1.domain.local
Protocol: 
LDAPv3
Port: 
11711 for vSphere 5.5 or 389 for vSphere 6.0
Base DN: 
dc=vsphere,dc=local
Level: 
User + Password
User DN: 
cn=Administrator,cn=Users,dc=vsphere,dc=local


Once you have successfully connected, you can quickly and easily view your sites and replication partners.


Thursday, March 30, 2017

How to patch a standalone ESXi 6.5 host

We received an email from Homeland Security regarding a severe vulnerability in ESXi that could allow a guest to execute code on an ESXi host. VMSA-2017-0006

http://www.vmware.com/security/advisories/VMSA-2017-0006.html


Patching is swift and easy using VMware Update Manager.  However, I recently stood up a standalone vSphere Hypervisor 6.5 host for testing.

For the record, ESXi patches are cumulative.

Here are the steps I took to patch this host.

1. Download applicable patches (Log in required).
http://www.vmware.com/patchmgr/download.portal 

Edit:  On Jan 10th 2018, I had to use the following link:

2. Upload the patches into the local datastore of the host you wish to patch.   I placed them in a folder called "patches" in the datastore:

3. Place the host in Maintenance Mode.

4. Enable ESXi Shell/SSH and log into the server.

5.  Run the following command for each patch to be installed:
esxcli software vib install -d "/vmfs/volumes/Datastore/DirectoryName/PatchName.zip" 

6. Run the reboot command.
reboot

7. Confirm the patches have been installed by running:
vmware -vl

Or, by looking at the version in the client:

8. Disable ESXi Shell/SSH

9.  Exit Maintenance mode and confirm functionality.